
Last updated November 17, 2026
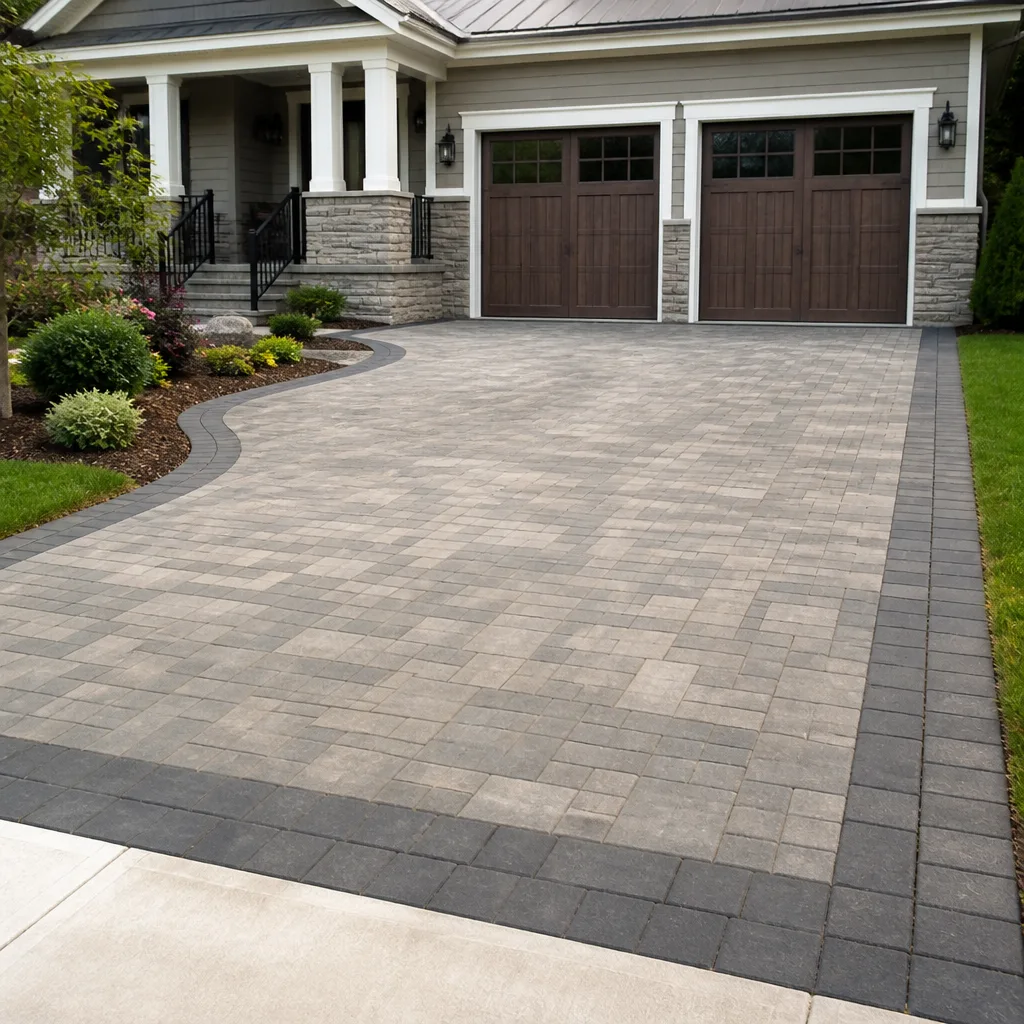 Driveway & pavers
 Kitchen remodeling
 Bathroom remodeling
 Home additions & ADU
 Roofing
 Windows & doors
 Fence
Free written scope consultation - allowances, timeline, and change-order rules on paper before a single trade is scheduled
Driveway & Pavers Maintenance Checklist for Miami Homeowners
The number one reason Miami driveways fail before their time isn’t the pavers themselves. It’s the sand-set base washing out through the joints during the 60+ inches of rain this city gets each year, and most homeowners don’t notice until a paver cracks underfoot or a corner of the drive starts to dip. By then, the repair has grown from a bag of sand into a full re-base. This guide gives you a task-by-task schedule built for Miami’s specific conditions: brutal UV, tropical downpours, and limestone-heavy soil that drains fast but shifts under pressure. Follow it and you’ll head off the $8,000 replacement most people never see coming.
Quick Answer
Miami pavers need joint sand checked monthly during the June – October rainy season, a UV-stable sealant reapplied every two to three years, and a post-storm inspection after every heavy rain event. Deep cleaning and re-sanding should happen once a year, ideally before the wet season starts in May. If joints stay full and water sheds off the surface, a properly installed paver driveway in Miami should hold up for 20 years or more.
Styles & brands we work with
- Kitchen remodeling
- Bathroom remodeling
- Home additions & ADU
- Roofing
- Windows & doors
- Driveway & pavers
- Fence
Table of Contents
- Why Miami’s Climate Is So Hard on Driveways and Pavers
- Monthly Joint Sand Check: The June – October Protocol
- Efflorescence vs. Mold: Telling Them Apart and Treating Each
- Choosing a UV Sealant for Miami’s Sun and How Often to Reapply
- Tree Root Intrusion: Royal Poinciana, Ficus, and Sea Grape Warning Signs
- Post-Storm Inspection Steps for South Florida Weather
- The Annual Deep-Clean and Re-Sand Schedule
- Common Mistakes to Avoid
Why Miami’s Climate Is So Hard on Driveways and Pavers
Miami asks more of a driveway than almost any market in the country. The sun alone is relentless: our UV index hits 11 or 12 in summer, which breaks down cheap sealers in a single season and fades lower-grade pavers within a few years. Add roughly 60 inches of rain, most of it compressed into afternoon downpours between June and October, and every joint in the driveway becomes a drainage point. Then there’s the ground itself. Much of Miami-Dade sits on limestone and sandy fill that drains quickly but doesn’t hold a base the way clay or compacted gravel does in other parts of the country. When water gets under the pavers, it moves fast and takes sand with it.
That combination attacks a driveway from two directions at once. From above, UV and rain strip the sealer, weaken the joint sand, and feed organic growth in the shaded spots. From below, water pushes through open joints, erodes the bedding layer, and lets individual pavers settle at slightly different heights, which is the early stage of every sunken driveway we’ve seen in Miami. The fix is rarely dramatic. It’s keeping the joints full, the surface sealed, and the base draining the way it should.
Neighborhood matters, too. In Coral Gables and Pinecrest, mature tree canopies shade driveways for most of the day, which cuts UV damage but keeps the surface damp and vulnerable to mildew. In newer developments out west and in Doral, driveways sit in full sun with less shade and drier soil, so UV damage and hairline joint cracks lead the list. Same city, different problems. A maintenance schedule that ignores that difference will miss half the issues.
Monthly Joint Sand Check: The June – October Protocol
Joint sand is the cheapest insurance a paver driveway has, and in Miami it’s under constant attack. Once the sand drops below the paver chamfer, water has a direct path to the bedding layer, and that’s when erosion starts. During the wet season, walk your driveway once a month with a hose and a broom, and follow these steps:
- Check every joint by eye. Crouch down and look across the surface at a low angle. Any joint where you can see a gap deeper than a quarter inch needs sand.
- Test with the broom. Sweep a light layer of joint sand across the whole surface and look at where it disappears. Those are the joints that have opened.
- Refill with polymeric sand, not mason sand. Polymeric sand sets up with a slight flex and holds better through rain. Mason sand washes out faster.
- Water it in. Mist the surface, not soak it, and let it cure for 24 hours. Don’t drive on it during that window.
- Check after every storm. If a heavy rain leaves visible sand at the driveway edge or in the street gutter, you lost it through the joints.
Why monthly? Because a single August downpour can drop two inches of rain in an hour. Water that hits an open joint at that volume erodes the bedding layer under the paver in one event. Monthly checks in the wet season catch the problem while it’s still a bag of sand and an hour of your time instead of a repair crew pulling up pavers.
Efflorescence vs. Mold: Telling Them Apart and Treating Each
Homeowners in Miami regularly mistake one for the other, which means they use the wrong cleaning product and sometimes make the problem worse. Here’s how to tell them apart:
- Efflorescence is a white, powdery, or crusty salt deposit. It rises to the surface from the mortar, the base, or the paver itself as moisture moves up and evaporates. It brushes away easily in the early stages and reappears after rain.
- Mold and mildew are dark green, black, or grey growths that settle into the textured surface and get worse in the humid, shaded areas of a driveway. In Miami’s subtropical climate, north-facing and heavily shaded driveways are prime targets.
For efflorescence, the fix is patience and the right product. A mild acid-based efflorescence remover diluted per the label, applied to a wet surface, followed by a thorough rinse, handles most cases. Don’t use a pressure washer at high pressure, which can drive water deeper into the paver and trigger more efflorescence. If it keeps returning, that’s a sign moisture is pushing through from below, and the base or drainage needs inspection.
For mold and mildew, oxygen bleach (sodium percarbonate) is the right tool. Mix with water, apply, let it sit for the labeled time, and scrub with a stiff brush. Chlorine bleach works but can stain some pavers and is harsh on the surrounding landscape. The real fix for mold is eliminating the moisture: trim overreaching branches, clear the gutters, and reseal the surface so water sheds off instead of sitting.
Choosing a UV Sealant for Miami’s Sun and How Often to Reapply
Not all sealants survive a Miami summer. The distinction that matters most is UV stability. A solvent-based acrylic with UV inhibitors will hold up for roughly two to three years under our sun. A cheap water-based acrylic formulated for cooler climates can fail in one season, going chalky and peeling. Filming sealers give a deeper, enhanced color, but in Miami’s heat they can trap moisture if the driveway doesn’t drain well. Penetrating sealers leave the surface matte and breathable, which is better for driveways with shade issues or known moisture.
Here’s what to look for and how often to reapply:
- Look for UV-inhibitor language on the label. A sealer marketed for Florida climates will say so. Skip anything labeled for “northern” or “cool-climate” use.
- Match the sealer to the paver. Concrete pavers and clay pavers take different products. Check the paver manufacturer’s recommendation before you buy.
- Test yearly with the water bead. Splash a cup of water on the driveway. If it beads up, the sealer is intact. If it soaks in, it’s time to reapply.
- Reapply every two to three years in Miami. Plan the application for late spring (April or May) so the new sealer protects through the wet season.
- Apply on a dry, mild day. Avoid a day over 85°F or with rain in the forecast, and don’t seal within 48 hours of wet weather.
Price matters here but the cheapest sealer in Miami is almost always a false economy. A quality UV-stable product runs roughly 2 – 3 times the price of a low-grade one but lasts twice as long. Applied correctly, a good sealer cuts cleaning time in half and extends the life of the joint sand as well. It’s one of the few maintenance items where paying more upfront saves real money.
Tree Root Intrusion: Royal Poinciana, Ficus, and Sea Grape Warning Signs
Miami’s signature landscaping species are beautiful and mostly incompatible with a healthy driveway if they sit within 8 to 12 feet of it. Royal Poinciana has wide, shallow roots that spread hard, and a mature tree will push under a paver in five to seven years. Ficus hedges and trees are notorious for aggressive root growth that finds any moisture source, and a leaking or saturated paver base is exactly that. Sea Grape is usually a coastal shrub, but its roots run shallow and wide and can heave pavers near the beachside homes in Key Biscayne and Miami Beach.
What to watch for:
- Paver heaving: a paver that rises slightly above its neighbors with no obvious cause is often a root pushing underneath.
- Linear cracking: cracks running in a line across the driveway or curving like a root pattern.
- Sunken line or trench: a soft dip that follows a path suggests a root channel is collapsing soil under the base.
- Weeds in joints near a tree: roots and moisture often travel the same path, so weed growth concentrated near a tree warrants a closer look.
If you catch root intrusion early, a small excavation and a root barrier can save the driveway. Once roots have lifted multiple pavers, the fix involves lifting the driveway, cutting roots, resetting the base, and reinstalling the pavers. That’s a job for a professional crew and a job we handle regularly in Miami’s older neighborhoods. If the tree is on a neighbor’s property, an arborist should be consulted before any cutting, since Miami-Dade has rules protecting certain species.
Post-Storm Inspection Steps for South Florida Weather
Tropical storms and hurricanes don’t just bring wind. They bring water, and in Miami that water moves fast through everything the storm crosses. After any event that drops more than an inch of rain in a few hours, walk the driveway within 24 to 48 hours and check the following:
- Look for sunken pavers. A paver that sits lower after the storm is a sign that the bedding sand under it has washed out. This can happen in a single storm.
- Check the edge restraint. The paver edging and the concrete or plastic restraint at the driveway edge is what keeps everything from spreading. If it’s loose, water gets in.
- Look for sinkholes or soft spots. Probe soft areas with a screwdriver. If it sinks easily, the base is likely compromised.
- Check the joint sand level after the drive drains. Storm water strips it faster than normal rain. Expect to top off joints after each major storm.
- Inspect for efflorescence bloom. A white haze that appears 1-2 weeks after a storm is normal, expected efflorescence. Clean it with an efflorescence remover, not a pressure washer.
- Look for mold and algae colonization. Shaded areas stay wet longer after a storm. A quick brush with an oxygen bleach mix early prevents a bigger problem.
One thing that surprises homeowners: hurricane flooding doesn’t usually break the pavers, it undermines them. The visible surface looks fine the day after, and the damage shows up a month or two later as a soft spot. Catching it early with a simple probe can save the cost of a full reinstall. If you find soft spots or a section that moved, get a professional out to assess before the next storm season. A free estimate from a reputable crew is the cheapest diagnosis you’ll find.
The Annual Deep-Clean and Re-Sand Schedule
Once a year, ideally in April or early May before the wet season, set aside a weekend for a full driveway reset. This is the maintenance pass that keeps everything else simple.
- Clean the surface. Sweep off debris, then pressure wash at moderate pressure (under 1500 PSI) with a surface cleaner attachment. Work from the high end toward the drain or street.
- Clear weeds from every joint. Use a joint knife or screwdriver, then apply a targeted weed killer (glyphosate-free if you have pets or kids).
- Treat efflorescence and organic growth separately. Use an efflorescence remover on white powdery deposits and an oxygen bleach mix on dark growth. Never mix them.
- Inspect the base and edging. Tap pavers gently. A hollow sound indicates a problem under that paver, and edge restraint should be tight.
- Re-sand every joint. Fill with a quality polymeric sand, compact with a plate compactor (if you have one), mist, and cure.
- Re-seal if needed. Use the water-bead test. If the surface absorbs water, plan to seal within two weeks.
A driveway that’s been maintained on this annual schedule plus monthly checks during wet season will hold up for 20+ years in Miami. Skip it, and you’re looking at resurfacing or replacement in half that time. The math is clear: a $300 annual maintenance routine versus an $8,000 driveway replacement. That’s the gap this whole guide is about. Every step above maps to that gap.
If the driveway is showing signs of a bigger problem (uneven settling, spread edging, cracked pavers in multiple spots), the fix usually goes beyond maintenance. This is the moment to look at the full scope of Driveway & Pavers in Miami and get a professional evaluation before the next storm season. The same goes for driveway borders and retaining walls, which take a similar beating and often fail before homeowners notice.
Common Mistakes to Avoid
- Skipping the monthly joint sand check in wet season. Miami’s June – October rain events can strip a season’s worth of sand in weeks. A five-minute monthly check prevents the most expensive problem there is.
- Using mason sand instead of polymeric sand. Mason sand washes out through Miami’s afternoon downpours, so you’ll be refilling a joint you already filled. Polymeric sand flexes and holds, and the upfront cost is worth every dollar.
- Pressure washing at high PSI. Above 1500 PSI, you can pit the paver surface and drive water into the base. That triggers more efflorescence and can start base erosion from the top down.
- Sealing a wet or dirty driveway. Sealer applied over a surface that hasn’t fully dried or hasn’t been cleaned will peel within a year. This is especially common after Miami’s summer rains when homeowners are impatient.
- Mistaking efflorescence for mold and using the wrong cleaner. Bleach on efflorescence makes it worse. Acid on mold can etch a paver. Match the cleaner to the problem.
- Ignoring a single sunken paver. One paver settling is a sign the base is eroding under it. In Miami, that means the washout is already underway and will spread.
- Planting a Royal Poinciana within 10 feet of the driveway. The tree is beautiful, but those roots will find and lift a paver within a few years. Plan the landscaping before the driveway goes in, not after.
See the difference
 Before
 After
 Before
 After
 Before
 After
When to Call a Professional
Maintenance is a homeowner job. Correcting the problems maintenance prevents is not. Call a professional crew when you’re seeing any of the following: pavers settling unevenly across more than two square feet; visible base failure or a soft spot that sinks underfoot; edge restraint that has separated from the driveway; multiple pavers cracked in a pattern that suggests root intrusion; efflorescence that returns within weeks of cleaning; or mold growth that keeps coming back despite proper treatment. Any single one of these is a warning that the underlying cause is more than surface maintenance can fix. Left alone, they turn into a full reinstall.
If your driveway is adjacent to a fence or a retaining wall, that’s another place to look. A failing fence post footing and a settling driveway often share the same underlying drainage problem, and the fix should address both. You can find that service under Fence Installation in Miami. Similarly, if you’re planning an addition or an ADU over the same soil, the driveway and the foundation need to be planned together. Our Home Additions & ADU in Miami team handles that kind of full-scope planning.
Groundwork Construction Co. of Miami offers free estimates across Miami, and our technicians have up to 12 years of experience with paver driveways and South Florida base conditions. Every job is covered by our 730-Day Done Right Promise: if it’s not done right, we make it right. Call (833) 968-1198 to schedule yours.
Frequently Asked Questions
Check the joints monthly during the June – October rainy season, and refill any that have dropped below a quarter inch. Plan on a full re-sand once a year in April or May, before the wet season starts. Miami’s rainfall washes out mason sand quickly, so a polymeric sand, refilled before each wet season, holds up far better.
White powdery powder is usually efflorescence, a salt deposit pulled up from the base or from within the pavers. Mold and mildew are dark green or black and settle into the textured surface, particularly in shaded areas. Efflorescence is treated with a dedicated efflorescence remover; mold is treated with an oxygen bleach mix. If efflorescence keeps returning, call (833) 968-1198 for a free assessment; a base moisture problem is often behind it.
Every two to three years with a UV-stable sealer. Miami’s UV index is brutal, and cheap sealers can fail within a single season. Test with a cup of water: if it beads, the sealer is intact; if it soaks in, it’s time to reseal. Late spring is the ideal window.
Yes. Royal Poinciana, Ficus, and Sea Grape roots regularly push through a Miami paver base and lift or crack pavers within a handful of years. The early warning sign is a paver rising above its neighbors with no obvious cause. Once roots have lifted more than one or two pavers, the repair involves lifting, cutting roots, and resetting the base. Call us at (833) 968-1198 for a free estimate; estimates are free, and early intervention is much cheaper than a full reinstall.
Walk the driveway within 24 to 48 hours and probe any soft spots with a screwdriver. A paver that’s settled after a storm means the base under it has washed out. Check the edge restraint, top off the joint sand, and watch for efflorescence in the two weeks that follow. If you see a soft spot, don’t wait for the next storm.
Not with us. We provide no-hassle upfront pricing, and the number you see is the number you pay. Every quote is a written line-item estimate, and our 730-Day Done Right Promise means if it’s not done right, we make it right. Call (833) 968-1198 to schedule a free estimate, and we’ll walk through the driveway and pricing with you in person.
The Bottom Line
Miami driveways fail from the joints up, not the pavers down. Monthly sand checks during the wet season, a UV-stable sealer reapplied every two to three years, annual re-sanding before the rains, and post-storm inspections after every major rain event are the difference between a driveway that lasts 20 years and one you replace inside a decade. Efflorescence, mold, and root intrusion are all fixable when you know what you’re looking at and address it early. The cost of maintenance is a fraction of the cost of replacement.
If your driveway is already showing the signs of a bigger problem, or if you’re ready to have it looked at properly, call us at (833) 968-1198 to schedule your free estimate. Learn more about our Groundwork Construction Co. of Miami home and the full scope of what we do.
Written by the team at Groundwork Construction Co. of Miami.